Hello friends. Today
I am going to explain how we can transform the rows of a table into columns.
Actually this question was asked by one of my blog reader Huzaifa.
Unfortunately the pivot task was not much helpful in the problem
statement mentioned by Huziafa. Let’s see what the problem was and how I provided
the solution for his problem.
I have pasted the screen shot of the configuration file that
we have, our requirement is that we have almost
800+ configuration values stored in the below text file. We need to
store these configuration values in a table in the format given below.
STONE_FILENAME
|
STONE_ID
|
STONE_WEIGHT4_CT
|
C:\Maya\final_planing_598.Mmd
|
MASTER
|
6.00000
|
As you can see in the below image, each record contains two
values, first value is left side from the “=” sign and the second value is in
the right side of “=” sign. So we need to consider left side value as parameter
name and right side value will be treated as value for the parameter.

We will create a table first and below is the script for
creating the table.
Create table Configsetting(ParameterName
varchar(100),ParameterValue varchar(100))
Now we will create a SSIS package to achieve the above mentioned problem’s solution.
I have taken a data
flow task in the control flow container(as shown in the below image and named
it Pivot), now just double click on this data flow task that will bring us on
data flow task container area.

In data flow
container area, we will pick a flat file source as our data is in a text file(
as shown in the below image) and named it Flat file Source.

Right click on the “Flat
File Source” task and click on edit menu that will bring us on a new screen as
shown in the below image.

Click on “New” button
as shown in the above image(encircled with red color),that will bring another
new screen as shown in the below image.

We have to give name
to the connection, in my case I have named as “File connection”, we will click
on “Browse” button to locate the configuration file, In my case, file location
is “C:\Users\Neeraj\Desktop\ETL\Config.txt” , Now , we will check the check box “column names
in the first data row” as our file containing first row as the column. Click
on “OK” button that will close the current screen and will bring us back to the
earlier screen.

Click on “OK” button
that will close the above screen, now we will take a derived column task from
the tool box and link it with flat file source as shown in the below image.

We will right click
on “derived column” task and click on “edit “ menu that will bring up a new
screen as shown in the below image.

I have added two
columns “ParameterName” and “ParameterValue” as shown in the above image and written
below expressions in the expression field.
ParameterName:- SUBSTRING(ParameterName,1,FINDSTRING(ParameterName,"=",1)
- 1)
ParameterValue:- SUBSTRING(ParameterName,FINDSTRING(ParameterName,"=",1)
+ 1,LEN(ParameterName) - (FINDSTRING(ParameterName,"=",1)))
Click on “OK” button
that will close the current screen.
Now we will take a “OLEDB
Destination” task and connect it with the “Derived Column” task.

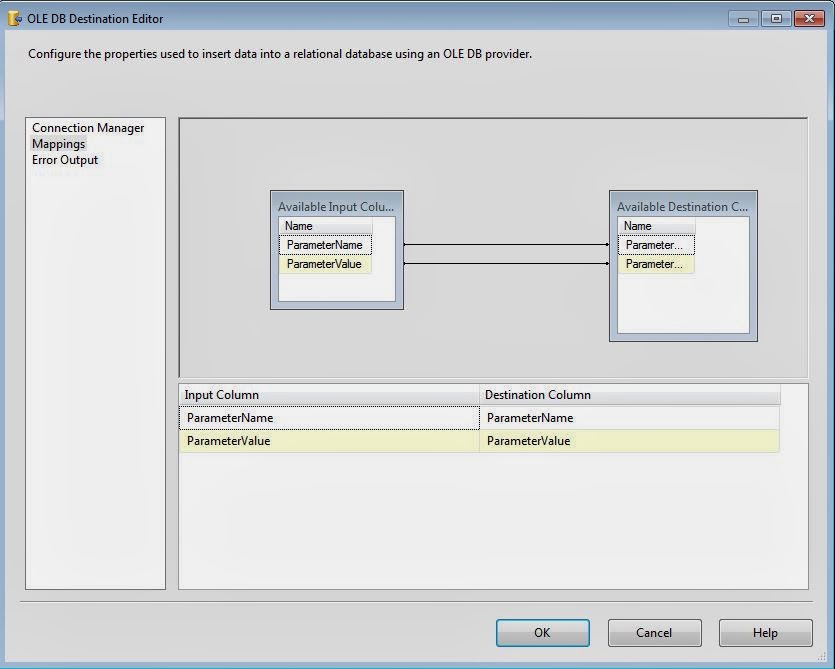
Right click on the “OLEDB Destination” task and click on “edit” menu that will bring up a new screen as shown in the below image.We will configure the
connection manager by clicking on the “New” button, once the connection is
setup , we will select the “Configsetting” table from the combo box list as
shown in the below image.

Then we will select the “Mappings” tab(which is at the top left side) and map the columns as shown in the below image.
Click on “OK” button that
will close the above screen.
In the below image,
we can see that “OLEDB Destination” task is showing an error message which says
“column parameter value cannot convert between Unicode a Non Unicode string
data types”. .

To overcome this problem, we will right click on the “Derived Column” task and click on “Show advanced Editor” that will bring a new screen (as shown in the below image). We will click on “input and output Properties” tab, in the left side pane, we will select the output column “ParameterValue” which will bring the properties for “ParameterValue” in the right pane and change the data type from Unicode to Non Unicode String. Click on “OK” button that will close the current screen and error message will not be there

We will run below SQL
script in the database to create the stored procedure.
create proc USp_convert_row_into_col
as
begin
if exists(select name from sysobjects where name='finalconfig')
drop table finalconfig
declare @tmp table(col varchar(50),val varchar(50),rowid int identity)
insert into @tmp(col,val) select ParameterName,ParameterValue
from Configsetting
declare
@maxcounter as int
declare
@mincounter as int
declare @colname as varchar(50)
declare @val as varchar(50)
select
@maxcounter=MAX(rowid),@mincounter=MIN(rowid) from @tmp
declare @Collist as varchar(max)
declare @vallist as varchar(max)
declare
@createtablesql as varchar(max)
set
@createtablesql='create
table finalconfig('
set @Collist=''
set @vallist=''
while
@mincounter <=@maxcounter
begin
select @colname =col,@val=val from @tmp where rowid=@mincounter
if @mincounter =1
begin
set @Collist=@Collist + '['+@colname+']' + ' varchar(50)'
set @vallist=@vallist + ''''+@val+''''
end
else
begin
set @Collist=@Collist+ ',' + '['+@colname+']' + ' varchar(50)'
set @vallist=@vallist + ',' + ''''+@val+''''
end
set @mincounter=@mincounter+1
end
set
@createtablesql=@createtablesql + @Collist + ')'
exec(@createtablesql)
exec('insert
into finalconfig select ' + @vallist)
End
Now we will take “Execute
SQL Task” in the “Control flow” container and connect it with the data flow
task as shown in the below picture. We will right click on the “Execute SQL
Task” and click on “Edit” menu that will bring us on the “Execute SQL Task
editor” Screen.

Here is the “Execute
SQL Task Editor” screen.

On the above screen,
we will provide the connection and SQL Statement, In our case SQL Statement is
stored procedure, at last step we will click on “OK” button. Now are ready with
the solution, let’s run this package and see what the result is.

Both the tasks ran
successfully as shown in the above image, as a result of this package, a table
has been created with name “finalconfig”. Now we will
check this table what this table contains.We can see in the below screen shot, we
got the intended result for which we created this package.

Important points to
be remembered:- This package has been created based on following assumptions.
- ParameterName will be unique for each row in the configuration file.
- Configuration file will not contain more than 1024 rows because this package creates a table as a result set and each row of configuration file is a column for this table and maximum no of columns in a table is 1024.
1 comment:
Wow, Thanks Neeraj for a quick & prompt solution to my problem. Hope it also help other users in future to a similar problem. :) cheers !!!
Post a Comment