Good Morning friends. Today we are going to learn how to import multiple text files in SQL table using foreach loop container task in SSIS. I have 3 text files with same set of information in all three files.

Let me show you the content of the one file. Below is the screenshot of the text file, You can see that I have added two column Eid and Name which are separated by "tab" and added few values in these columns.Other two files are having same structure with some different values.

Lets open BIDS(Business Intelligence Development Studio) to create a SSIS package. You can refer the below screenshot to open a new project in BIDS. You can see "Project" menu(encircled by red color), We will click on "Project" menu to open a new project.
 Once we click on "Project" menu, a new screen will come up, now we need to provide a suitable name to our SSIS package. In my case, I have named as "ForeachLoopExample" as shown in the below image(encircled by red color).

Now, we will click on "OK" button that will bring us on the below mentioned screen. Since we have multiple files to import, we will need to loop over the folder containing those files. Hence I have taken "Foreach Loop Container", We will select the"Foreach Loop Container" from the tool bar, drag it and put it into the "Control Flow" area as shown in the below image.

We need to set few properties of the "Foreach Loop Container", hence we will right click on the "Foreach Loop Container" and click on "Edit" menu as shown in the below image.


Now, we need to provide the path of the folder which is containing the files. For that purpose we will click on browse button and select the folder that is containing the text files. Underneath folder path there is a label "files", As we are going to process all text files, we will put "*.txt" in the "files" text field(encircled by black color)

Now, we will select "Variable Mappings" tab and click on combo list as shown in the below image and then further click on "New variable" item listed in the combo list.
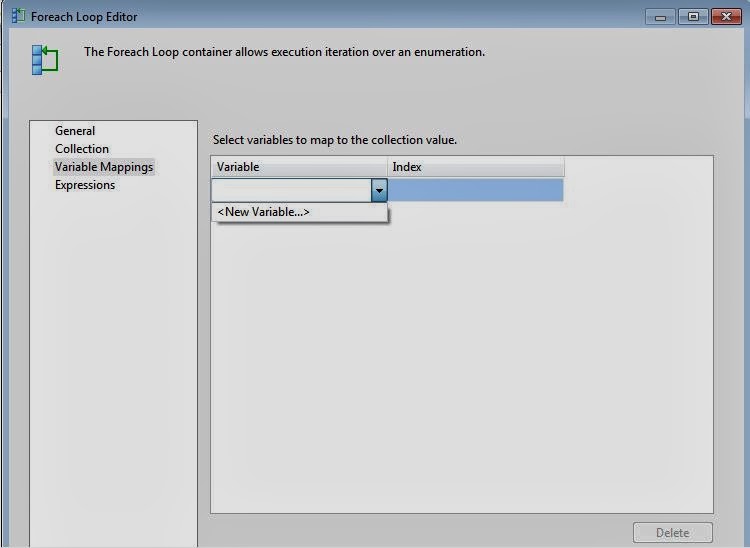
As soon as we click on "New Variable" item, it will bring up a new screen as shown in the below image.We need to provide a name to this variable, I have named as "FilePath" as it will store the path of the text files.

Clicking on "OK" button will bring up the below mentioned screen.

Next step would be to take a "Data Flow Task" and put it into the "Foreach Loop Container". We will select the "Data Flow Task" from the tool box and drag and drop it in the "Foreach Loop Container".

We will double click on the "Data Flow Task" that will bring us on the "Data Flow Task" area, where we will drag and drop a "Flat File Source" from the tool bar to "Data Flow Task" area as shown in the below image.

Right click on "Flat File Source" and click on edit menu that will bring a new screen as shown in the below image. We will give a name to this connection manager, In my case, I have given name "TextFileConnection".Now we Browse the file location by clicking on browse button as shown in the below image(encircled with 2nd boundary.
Note:- We have provided one file name i.e. "Emp.txt" in the file name but at the run time this "filename"would be changed every time when it picks next file from the folder. In the 3 boundary I have checked the check box "Column names in the first data row" as our files is containing the column names in the first row.

Click on the "Columns" tab , It will show the all data containing in the text file as shown in the below image.

Click on the "OK" button. In the connection managers region, a "TextFileConnection" named connection has already created, We will right click on it that will bring up properties window as shown in the below image.In the Expressions property there is a small button at right side.
 We will click on the small button that will bring a new window as shown in the below image. Now, we will click on property combo list and select the "Connection String" property from that list. In the below image the second column is "Expression" , there is small button showing in that column, click on that button that will bring a new window.


Click on "OK" button that will bring up the below screen.
 Click on "OK" button. Now we will select a "OLEDB Destination" from the tool box, drag and drop it from the tool bar to "Data Flow Task" region as shown in the below image.

Right click on the "OLEDB Destination" and click on the edit menu as shown in the below image.

 Click on "New" button encircled with blue color that will bring up below screen.

Further click on "New" button encircled with blue color in the above image that will further bring up a new screen. Below is the screenshot for your reference. We need to provide the Server name(encircled with red color) and database name(encircled with blue color) then click on "OK" button.

Now Join the "Flat File Source" and "OLEDB Destination" using the green arrow as shown in the below image.

Right click on "OLEDB Destination" task and click on properties menu that will bring up the below mentioned screen. Select the table name from the combo list in which we want to import the data.

Click on the "Mappings" tab and check the mappings, As the column names in the text file and the database table are same, SSIS package will automatically map the fields, otherwise we can map the names manually.

 Now, we can check in the database whether the data has been imported successfully or not.

I hope after reading this article you will be able to use Foreach loop container efficiently. Please feel free to post any questions if you have.
Lets open BIDS(Business Intelligence Development Studio) to create a SSIS package. You can refer the below screenshot to open a new project in BIDS. You can see "Project" menu(encircled by red color), We will click on "Project" menu to open a new project.
Now, we will click on "OK" button that will bring us on the below mentioned screen. Since we have multiple files to import, we will need to loop over the folder containing those files. Hence I have taken "Foreach Loop Container", We will select the"Foreach Loop Container" from the tool bar, drag it and put it into the "Control Flow" area as shown in the below image.
We need to set few properties of the "Foreach Loop Container", hence we will right click on the "Foreach Loop Container" and click on "Edit" menu as shown in the below image.
In the below image there are four tabs in the left side, General, Collection, Variable Mappings and Expressions, we will click on "Collection" tab, As we want to process text files in Foreach Loop Container,we we select "Foreach File Enumerator" from the list as shown in the below image.
Note:- We have provided one file name i.e. "Emp.txt" in the file name but at the run time this "filename"would be changed every time when it picks next file from the folder. In the 3 boundary I have checked the check box "Column names in the first data row" as our files is containing the column names in the first row.
We will Select user variable "FilePath" that we declared while configuring the "Foreach Loop Container", drag and drop it in the expression text field as shown in the below image.
Click on "OK" button that will bring up the below screen.
Right click on the "OLEDB Destination" and click on the edit menu as shown in the below image.
Clicking on the edit button will bring up below screen as shown in the image.
Further click on "New" button encircled with blue color in the above image that will further bring up a new screen. Below is the screenshot for your reference. We need to provide the Server name(encircled with red color) and database name(encircled with blue color) then click on "OK" button.
Now Join the "Flat File Source" and "OLEDB Destination" using the green arrow as shown in the below image.
Right click on "OLEDB Destination" task and click on properties menu that will bring up the below mentioned screen. Select the table name from the combo list in which we want to import the data.
Click on the "Mappings" tab and check the mappings, As the column names in the text file and the database table are same, SSIS package will automatically map the fields, otherwise we can map the names manually.
Click on "OK" button, Now our SSIS package is ready, Press "F5" key on the keyboard, if all the tasks filled with green color, it means your package ran successfully.
I hope after reading this article you will be able to use Foreach loop container efficiently. Please feel free to post any questions if you have.
4 comments:
nice explanation..will be looking forward to have this kind of explanation for the other enumerator in foreach loop..file and ADO.NET enum is easily available
Thanks Avix..for reading my blog and appreciating the content.. your suggestion has been taken, I will definitely explain other enumerator in foreach loop. thanks again.
very good explanation neeraj.I tried to search this type of detail explanation ...thanks and keep writing...
Thanks Abhishek for liking the content.
Post a Comment